My 5 Steps from Design to Finished Product
The best part of my business for me is definitely the design process. I always have so many ideas of creations I want to make and I love the whole process of taking them from ideas to a finished product. There is always a lot of tweaking and tinkering at each step and it can take a while because I am always fitting my work around my children but I love seeing the end product and how that feels to see what was in my head actually a real design!
There are 5 steps for me when I design a new product.
- Draw it out
- Get the design into the software
- Check the sewing order
- Sew a sample and Tweak the design
- Sew finished design.
Step 1 – Draw it out
When I have a new idea, I like to draw it out either in my sketchbook or on my iPad. I use Procreate and my apple pencil to draw out some sketches. This helps me to get a clear picture about what I want the design to look like and then I can also play about with colours too. When I can see the design on the page, I can start to figure out the shape of the design.
Step 2 – Get the design into the software
I have a Brother Innov-is 800e Embroidery machine and I use the Brother digitising software PE Design 10. All embroidery machines come with pre-loaded designs to embroider but if you want to make your own embroidery designs, you need to use a digitising software to create your own patterns.
There is a function for the software to auto digitise your image called ‘Auto punch’. It’s a useful tool and is great for images that have bright, clear and distinctive colours. Here is my unicorn design with bright colours to make sure the software can distinguish between the different sections.

The software takes you through the steps and the end result looks good. With this function, it is very important that you get your image right at the beginning of the process. Any mistakes and you will have to start the process all over again! This image of my unicorn design was drawn by me and I can change it and make sure that its right for the auto punch function. However, you may not have such a clear image to digitise. If you don’t distinguish very clearly between all the colours, some can be merged together, like the pink part of the ear and the lilac part of the mane, as we can see here.
You can customise each section to change the colours and type of stitch too.

I often prefer to draw the designs out myself in the software using the basic shapes in the program. I feel that it can be quicker and I can make it look exactly how I want it. I use the basic shapes and then use the ‘select point’ tool to drag and change the shape each section.

I love to create my designs with felt and if you embroider this design with filled shapes, this design would have over 16,000 stitches! The felt will struggle with that many stitches in such a small area, it would pucker and wouldn’t look the best. I like to just sew the outlines of each layer and use different colour felt layers to create the design. This not only helps reduce the stitch count, stops puckering and creates a layering that can make the design look more interesting.

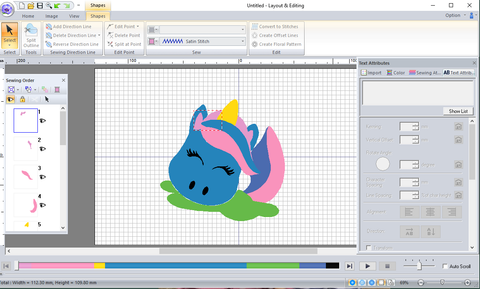
Step 3 – Check the Sewing Order
When each layer has been drawn out, I need to check the sewing order. When you are sewing different layers, they need to be sewn in the right order! The software has a function to simulate the design being sewn out.
When I go through the simulation, I can rearrange the layers. My embroidery machine doesn’t cut the jump stitches so when it sews different sections of the same colour, it doesn’t cut the thread in between the section and the thread trails along to the next section. You can change where the machine starts and stops the sewn sections so that you can minimise the jump stitches too.
Step 4 – Sew a Sample and Tweak the Design
The next step is to sew out a sample. As much as I take time to make sure the design is optimised for sewing it out. I always find there is something that I haven’t thought of! It’s great when I sew out a sample and it works but most of the time, there will be something I hadn’t thought of!
For example, when I was making the new bunting styles, I placed the buttonholes for the ribbon centrally. I found that when I hung the bunting up, some of the styles didn’t hang right. The tops were too heavy and so the characters didn’t hang straight. Moving the buttonholes higher up, balanced the bunting characters so they hung in a better way. Just like in the Under the Sea bunting design I have been working on. The whale and crab designs would not hang straight, they kept laying flat. Moving the buttonholes up (in the right pic) meant that the whale and crab hung straighter just like the other characters!


Once the design has been tweaked, the pattern is ready to be sewn out for the final product!

The design has been drawn, digitised, the pattern has been optimised, a sample has been sewn, the design tweaked and final design sewn! It can take some time but I love that I can create a design from the ideas I have in my head! I know that my products will look exactly how I want and are unique to my style too!